AWS 官方博客:用 Amazon Bedrock 与 LiteLLM 搭建自服务 LLM 网关
Building a self-service LLM gateway with Amazon Bedrock and LiteLLM
AWS Machine Learning Blog 发布教程,讲解如何用 Amazon Bedrock Application Inference Profiles 和运行在 AWS Fargate 上的 LiteLLM 搭建自服务 LLM 网关,将 Amazon Bedrock 抽象为 OpenAI 兼容 API。
Developers want AI coding assistants with minimal setup. With a large language model (LLM) gateway and LiteLLM, they can quickly access foundation models (FMs) available on Amazon Bedrock while you gain visibility and usage control. Platform teams need to monitor latency and errors, finance teams need to attribute inference costs to teams and projects, and security teams need consistent access controls. An LLM gateway can help address these needs by providing a centrally managed access point to the models that power coding assistants.
In this post, we show how to build a self-service LLM gateway using Amazon Bedrock Application Inference Profiles with LiteLLM running on AWS Fargate to abstract Amazon Bedrock behind an OpenAI-compatible API. With this pattern, developers can access foundation models through a single API with a dedicated key while you gain per-user cost controls and model performance observability. By the end, you will understand the pattern well enough to build your own version from the illustrative snippets and AWS Cloud Development Kit (AWS CDK) constructs. This post uses Claude Sonnet and Claude Haiku models for example purposes. For a list of models and availability by AWS Region, see Supported models by AWS Region in Amazon Bedrock.
This LLM gateway pattern follows a straightforward request flow from the developer, through the LiteLLM layer, to Amazon Bedrock and the underlying FM. The following diagram illustrates the production topology behind that flow. For simplicity, we don’t cover the addition of Amazon Bedrock Guardrails, such as content filtering and grounding, but you would normally include appropriate responsible AI controls before deploying to production.
A developer’s OpenAI-compatible client reaches the LLM gateway through Amazon Route 53, Amazon CloudFront, and an Application Load Balancer (ALB). It authenticates to LiteLLM on Fargate with a per-user API key. Behind that, the request draws on Amazon Relational Database Service (Amazon RDS) (PostgreSQL) for virtual-key and spend state. It also interacts with Amazon ElastiCache for Valkey as a cache, and AWS Secrets Manager for secrets. LiteLLM then ultimately invokes Amazon Bedrock Application Inference Profiles using a scoped AWS Identity and Access Management (IAM) task role. Amazon CloudWatch captures requests per minute (RPM) and tokens per minute (TPM) metrics and the quota alarm.
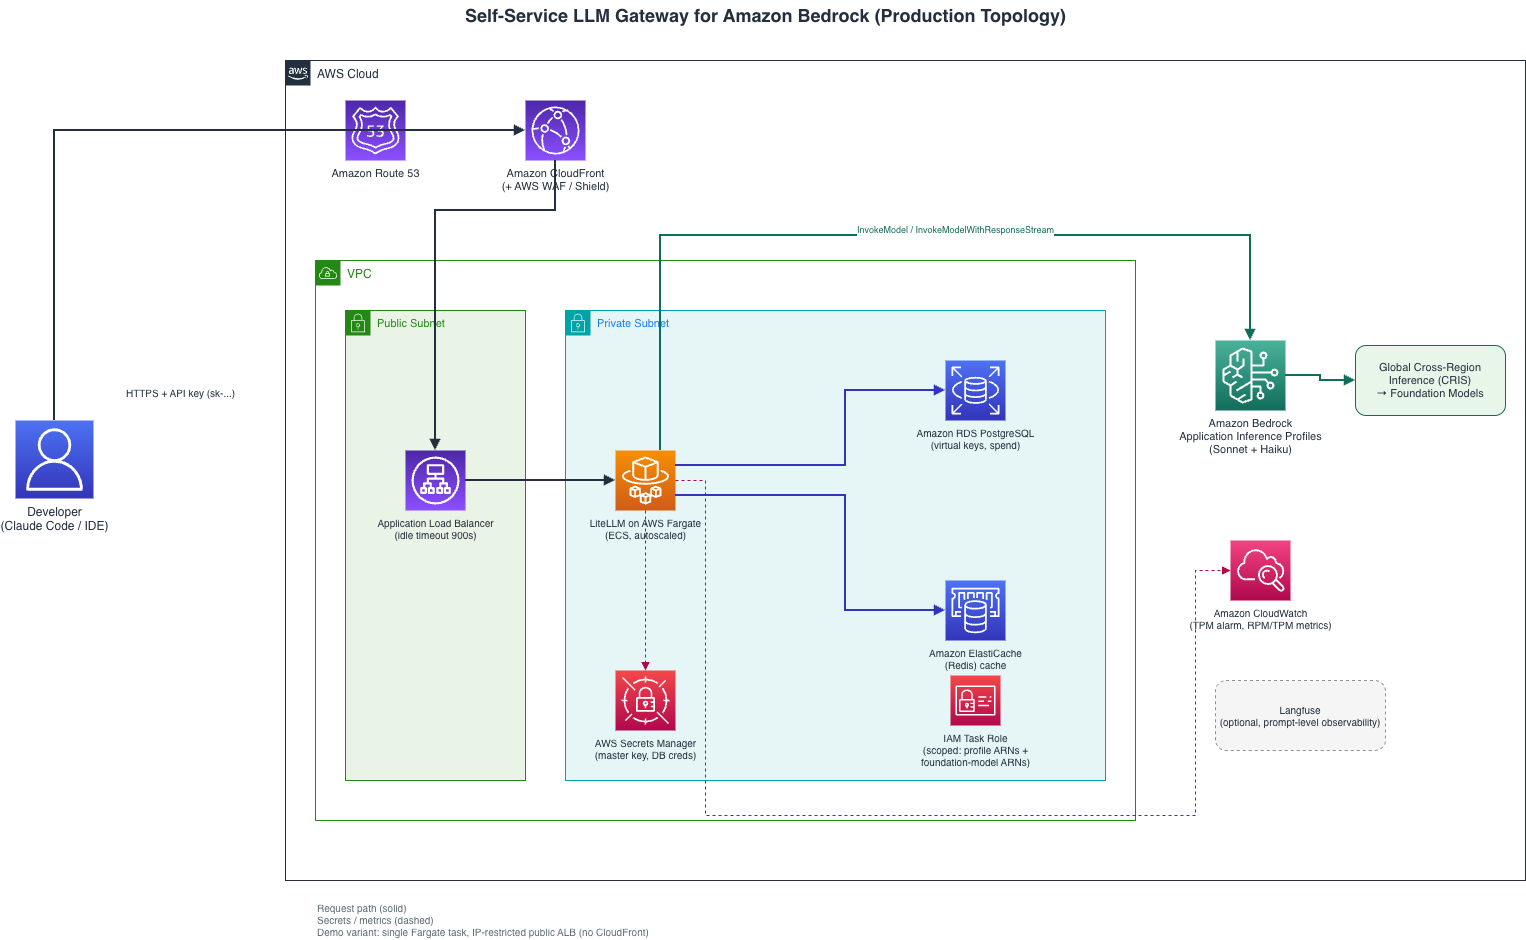
Figure 1: LLM gateway architecture (production topology)
The architecture consists of these core components:
- LiteLLM on AWS Fargate: LiteLLM provides a proxy that exposes an OpenAI-compatible API. We run it on an AWS Fargate task with target-tracking Auto Scaling on CPU utilization. Developers point their tools at this endpoint and don’t interact with Amazon Bedrock directly.
- Self-service portal: LiteLLM includes a lightweight portal for admin and developer self-service. This web app can integrate with your corporate single sign-on (SSO). Using the portal, operations engineers set the spend policy while developers self-provision API keys within those parameters.
- Persistent and cache storage: LiteLLM uses Amazon ElastiCache for Valkey for non-persistent response caching. It also coordinates rate-limiting across AWS Fargate tasks. A separate Amazon RDS (PostgreSQL) database is the database of record for persistent state such as API key metadata and spend tracking.
- Amazon Bedrock Application Inference Profiles: Each model (such as Claude Sonnet and Claude Haiku) gets its own inference profile, which you manage using the AWS Cloud Development Kit (AWS CDK). With this, you get per-model quota isolation and a clean abstraction layer between LiteLLM’s configuration and the model versioning of Amazon Bedrock.
- Langfuse: Open source LLM observability for prompt-level telemetry, latency tracking, and debugging. It complements the infrastructure-level metrics of Amazon CloudWatch with application-level insight.
By using an OpenAI-compatible protocol, developers can configure their tools, such as Claude Code, Continue, and Cursor, with a single base URL and API key. Developers then operate at a level above the Amazon Bedrock backend and can swap models, add fallbacks, or migrate model providers without touching developer configurations.
Prerequisites
You will need an AWS account, Amazon Bedrock model access, and appropriate IAM permissions to deploy this project. You will also need LiteLLM. The LiteLLM AI Gateway component is open source and suitable for a small pilot with some limitations. LiteLLM documents the AI Gateway as free for up to five users with a license required beyond that. LiteLLM Enterprise is a scalable, production-minded licensed version that includes the open source gateway plus single sign-on, audit logs, delegated admin roles, and support. While the free tier supports virtual keys, the self-service key issuance described in this post requires the Enterprise version.
End-to-end configuration: Left to right
We walk through each configuration layer from the developer’s machine to the foundation model.
Step 1: Developer IDE configuration (for example, Claude Code)
Developers configure their coding assistant to point to the LLM gateway. This is the only configuration a developer needs to make to their tool:
{
  "apiProvider": "openai-compatible",
  "apiBaseUrl": "https://llm-gateway.internal.example.com/v1",
  "apiKey": "sk-user-abc123",
  "model": "claude-sonnet-4-20250514"
}
With that configuration, each developer gets their own API key from the self-service portal and drops it into their tool configuration.
Step 2: LiteLLM gateway configuration
Deploy LiteLLM to a container service following the LiteLLM documentation. In this example we are using AWS Fargate. This will include the portal, which you can open at http://localhost:4000/ui during local testing.
The LiteLLM gateway is where you will map and enforce model names to Amazon Bedrock inference profile ARNs with per-key spend limits:
model_list:
  - model_name: claude-sonnet-4-20250514
    litellm_params:
      model: bedrock/arn:aws:bedrock:us-east-1:111122223333:application-inference-profile/sonnet-profile-id
      aws_region_name: us-east-1
      max_retries: 3
      timeout: 900  # 15 min for extended thinking
    # REQUIRED for spend tracking: when `model` is a raw inference-profile ARN,
    # LiteLLM can't find it in its built-in cost map and defaults the cost to $0
    # which means per-key `spend` stays 0 and budgets NEVER enforce. Set the
    # per-token costs explicitly.
    model_info:
      input_cost_per_token: 0.000003        # example cost
      output_cost_per_token: 0.000015    # example cost

  - model_name: claude-haiku-4-5
    litellm_params:
      model: bedrock/arn:aws:bedrock:us-east-1:111122223333:application-inference-profile/haiku-profile-id
      aws_region_name: us-east-1
      timeout: 120
    model_info:
      input_cost_per_token: 0.000001       # example cost
      output_cost_per_token: 0.000005    # example cost

litellm_settings:
  max_budget: 250            # example per key cost
  budget_duration: 7d      # Rolling 7-day window
  max_parallel_requests: 10
  set_verbose: false
  cache: true
  cache_params:
    type: redis    # Valkey is protocol-compatible, so this stays "redis"
    host: elasticache-endpoint
    port: 6379
master_key: os.environ/LITELLM_MASTER_KEY
database_url: os.environ/DATABASE_URL
Set on the Fargate task from AWS Secrets Manager:
LITELLM_MASTER_KEY=sk-platform-admin-... DATABASE_URL=postgresql://user:password@rds-endpoint:5432/litellmNote: Don’t hardcode the master_key or database credentials in config.yaml. LiteLLM resolves os.environ/VAR_NAME references at load time, so set LITELLM_MASTER_KEY and DATABASE_URL as environment variables on the Fargate task, sourced from AWS Secrets Manager. Set the Langfuse credentials the same way in Step 5.
When a developer calls claude-sonnet-4-20250514, for example, LiteLLM resolves it to the inference profile ARN. It then authenticates to Amazon Bedrock using the AWS Fargate task’s IAM role and streams the response back in OpenAI format.
Step 3: Bedrock inference profiles (CDK)
With Amazon Bedrock Application Inference Profiles you can create named endpoints for specific models, so you get quota isolation and fine-grained IAM control.
Choosing cross-Region inference (CRIS): Geographic or Global
Amazon Bedrock CRIS avoids the overhead of implementing cross-Region request routing yourself. Other benefits include:
- Access to a broader pool of Regional capacity.
- Automatic routing of requests to a supported Region with available capacity.
- Broader model selection, because some models are available only through an inference profile.
For this proxy pattern, we recommend Global cross-Region inference when the selected models support it and organizational policies permit inference processing across supported AWS commercial Regions worldwide. Geographic cross-Region inference keeps processing within a defined geography. For example, a US inference profile routes requests only to supported US Regions. Global cross-Region inference provides access to a broader pool of Regional capacity with potential pricing benefits compared with Geographic cross-Region inference. You can verify model availability, applicable service quotas, and model-specific pricing through current AWS documentation and AWS pricing pages.
CDK construct
import * as cdk from 'aws-cdk-lib';
import * as bedrock from 'aws-cdk-lib/aws-bedrock';
import * as iam from 'aws-cdk-lib/aws-iam';

// Create an Application Inference Profile pointing to the Global CRIS
// system-defined inference profile (note the `global.` prefix in the ARN).
const sonnetProfile = new bedrock.CfnApplicationInferenceProfile(this, 'SonnetProfile', {
  inferenceProfileName: 'claude-sonnet-gateway',
  modelSource: {
    copyFrom: `arn:aws:bedrock:us-east-1:${this.account}:inference-profile/global.anthropic.claude-sonnet-4-20250514-v1:0`,
  },
  description: 'Claude Sonnet for developer coding assistants (Global CRIS)',
});

// Grant LiteLLM's task role access to invoke the profile.
// For Global CRIS, include the inference profile, the regional FM, and the global FM resources.
litellmTaskRole.addToPolicy(new iam.PolicyStatement({
  effect: iam.Effect.ALLOW,
  actions: ['bedrock:InvokeModel', 'bedrock:InvokeModelWithResponseStream'],
  resources: [
    sonnetProfile.attrInferenceProfileArn,
    'arn:aws:bedrock:us-east-1::foundation-model/anthropic.claude-sonnet-4-20250514-v1:0',
    'arn:aws:bedrock:*::foundation-model/anthropic.claude-sonnet-4-20250514-v1:0',
  ],
}));
Important: For Global CRIS, the copyFrom ARN must reference the system-defined inference profile prefixed with global., not the foundation-model ARN directly. Using a foundation-model ARN creates a single-Region profile without cross-Region routing. Additionally, the IAM policy must include the resource ARNs the invocation actually touches: the application inference profile and the underlying foundation model in any Region it might route to (Region-wildcarded). Scoping only to the application-inference-profile ARN returns not authorized to perform: bedrock:InvokeModel on resource: arn:aws:bedrock:us-east-1::foundation-model/... at invoke time. This is scoped least-privilege: it names the exact models in use, not bedrock:* or *.
Step 4: Bedrock invokes the foundation model
The inference profile handles model resolution and cross-Region routing transparently without additional configuration. When LiteLLM calls the inference profile ARN, Amazon Bedrock routes to available capacity across configured AWS Regions and returns the response.
Step 5: Langfuse observability
LiteLLM integrates with Langfuse through logging callbacks, providing visibility into model invocations without requiring changes to developer tool configurations. To enable the integration, merge the following entries into the existing litellm_settings block from the Step 2 configuration, preserving existing callback entries:
litellm_settings:
  success_callback: ["langfuse"]
  failure_callback: ["langfuse"]  # also log failed requests
Configure the Langfuse public key, secret key, and deployment endpoint as environment variables on the Fargate task. Store the credentials in AWS Secrets Manager:
LANGFUSE_PUBLIC_KEY=pk-lf-...
LANGFUSE_SECRET_KEY=sk-lf-...
LANGFUSE_HOST=https://us.cloud.langfuse.com  # or your self-hosted URL
The endpoint must match the selected Langfuse Cloud region or self-hosted deployment. Choose the hosting option based on data governance and operational requirements. Before enabling prompt and response logging, review the content captured by the integration and configure appropriate redaction, retention, and access controls.
Langfuse traces can include prompts, responses, model parameters, token usage, and latency, depending on the integration and logging configuration. This information helps investigate unexpected model responses and complements the operational metrics collected in Amazon CloudWatch.
Implementing cost controls
Cost controls are an important dimension to a successful AI strategy. Without cost controls, heavy usage of extended thinking features can lead to unexpectedly high charges, which we observed in our early pilots.
The spend limits configured in Step 2 (max_budget: 250, budget_duration: 7d) enforce a rolling 7-day window per API key, provided per-model model_info costs are set (refer to the Step 2 note). When a user reaches their limit, LiteLLM returns an HTTP 429 code with a clear message explaining that their budget has been exceeded. There’s no silent degradation or surprise bill. Developers and engineering teams can check current spend and reset timing through any of the following:
- Daily spend: Query GET /user/daily/activity with a
start_dateandend_daterange to get per-day metrics: spend, prompt tokens, completion tokens, and API requests, broken down by model, provider, and API key. - Per user spend: Query GET /user/info?user_id=… for a summary of a user’s total spend and the spend on each of their associated API keys.
- Portal dashboard: The Admin UI (at
https://<proxy-host>/ui) includes a Usage tab where developers and admins can browse spend by model, user, and tag without hitting the API directly.
These same endpoints are how your finance team gets per-user attribution without you building custom metering infrastructure. A scheduled job hitting /user/daily/activity or /global/spend/report is enough to feed a cost dashboard or chargeback report.
Developer self-service portal
The self-service portal also handles key lifecycle processes. Developers authenticate with your corporate SSO to generate a key bound to their identity, which they can later regenerate if the key is exposed or to match a rotation policy. Platform engineers configure the budget policy once for individual developers to autonomously operate within their constraints. Two things developers use the portal for directly:
- Key generation: On the Admin UI’s Virtual Keys page (
https://<proxy-host>/ui), developers authenticated through SSO choose Generate Key to create their own key, bound to their identity. - Rate limit visibility: Each
/chat/completionsresponse includesx-litellm-key-remaining-requests-{model}andx-litellm-key-remaining-tokens-{model}headers, so developers can see their remaining RPM and TPM headroom for that model directly in their tool’s response. This is distinct from the dollar-based spend tracking earlier in this post.
Monitoring and observability
For an LLM gateway, traditional metrics like latency percentiles can be misleading, especially with extended thinking models, where a single request can take several minutes. Instead, we focus on requests per minute (RPM) and tokens per minute (TPM) as primary signals. Here, Amazon CloudWatch can help you monitor and alarm for these signals with the following configuration.
Amazon CloudWatch alarms for quota management
new cloudwatch.Alarm(this, 'BedrockTPMAlarm', {
  metric: new cloudwatch.Metric({
    namespace: 'LiteLLM/Gateway',
    metricName: 'TokensPerMinute',
    statistic: 'Sum',
    period: cdk.Duration.minutes(1),
  }),
  // Alert at ~60% of your account's TPM quota (check Service Quotas for your
  // actual limit, defaults vary by model and account).
  threshold: 600000,
  evaluationPeriods: 3,
  comparisonOperator: cloudwatch.ComparisonOperator.GREATER_THAN_THRESHOLD,
  alarmDescription: 'TPM approaching Bedrock quota - request increase proactively',
});
Note that the alarm configuration alerts at 60–70 percent quota utilization rather than waiting for throttling. This provides lead time to scale Amazon Bedrock quotas before users experience degradation.
Emitting the metric: LiteLLM has no built-in callback that publishes a metric named TokensPerMinute to a LiteLLM/Gateway namespace, so the alarm needs a source. A small custom-logger callback that calls CloudWatch PutMetricData on each request does the job. Register it through litellm_settings.success_callback (which is additive), not callbacks. The callbacks list replaces LiteLLM’s internal logger list, which includes the built-in spend-tracking logger, and will silently disable budget enforcement.
Here’s a minimal version of that callback, using LiteLLM’s CustomLogger class:
import boto3
from litellm.integrations.custom_logger import CustomLogger

cloudwatch = boto3.client("cloudwatch")

class TPMEmitter(CustomLogger):
    async def async_log_success_event(self, kwargs, response_obj, start_time, end_time):
        total_tokens = kwargs.get("standard_logging_object", {}).get("total_tokens", 0)
        cloudwatch.put_metric_data(
            Namespace="LiteLLM/Gateway",
            MetricData=[{
                "MetricName": "TokensPerMinute",
                "Value": total_tokens,
                "Unit": "Count",
            }],
        )

# Register alongside success_callback, not in place of it:
import litellm
litellm.callbacks = [TPMEmitter()]
For prompt-level debugging, we run Langfuse alongside CloudWatch. When a developer reports “the model gave a bad response,” you can use Langfuse to inspect the exact prompt, token counts, and model parameters. For compliance-sensitive environments, Amazon Bedrock’s native invocation logging to Amazon Simple Storage Service (Amazon S3) provides an immutable audit trail.
Lessons learned at scale
We deployed this pattern end-to-end on a fresh AWS account to confirm the sample snippets work. In our own deployment, we scaled this LLM gateway to several hundred developers and learned several lessons.
Operational lessons
The main findings from running at scale:
- Extended thinking changes everything about latency. Requests using Claude’s extended thinking can take several minutes or longer, depending on the thinking budget. If your load balancer has a 60-second idle timeout, those requests will fail silently. To address that, you can set load balancer idle timeouts to at least 900 seconds and configure LiteLLM’s request timeout accordingly (
timeout: 900in the Step 2 configuration earlier in this post). - When throttled, back off and retry on the same model before initiating a fallback. Our initial instinct was to fall back from Sonnet to Haiku upon throttling. But this is suboptimal for coding assistants because changing models breaks the consistent behavior developers rely on. Instead, retry the same model with exponential backoff at the proxy level (
max_retries: 3in Step 2). When a request cannot be served after retries, surface the error clearly rather than returning an alternate model’s completions. - Separate automation tool invocations from developer traffic. continuous integration and continuous delivery (CI/CD) pipelines and automated code review tools should call Amazon Bedrock directly with their own inference profiles and quotas. Mixing automation traffic with interactive developer traffic leads to unpredictable latency and hinders meaningful cost attribution.
- Start with Global CRIS from day one, if feasible. We initially used Geographic (US) CRIS but ultimately migrated our inference profiles when we reached Regional quota limits. For our use case, we didn’t have data residency constraints so we could use Global CRIS. Global CRIS routes requests across Regions to draw on a broader capacity pool, simplifying management at scale.
Deployment considerations
Two configuration mistakes are common and hard to notice until spend or connectivity breaks:
Configuring per-model costs is mandatory for enforcing budgets. The model_info block on each model isn’t optional if you want to track per-user cost controls. When model points at an Amazon Bedrock inference-profile ARN, LiteLLM can’t look up the ARN in its built-in pricing table. It instead records $0 per token, so the max_budget and 429 throttle enforcement silently don’t trigger. Spend remains at $0 no matter how many tokens flow. Fix this by setting input_cost_per_token and output_cost_per_token (or input_cost_per_million_tokens).
Database compared to cache: The database_url must be PostgreSQL. LiteLLM’s virtual keys (/key/generate), store_model_in_db, and spend tracking are Postgres-backed.
A handful of smaller deployment details rounded out our checklist:
- Global CRIS IAM needs the foundation-model resources, not only the app-inference-profile ARN. Otherwise, invocation is denied at runtime.
- Give the Fargate task enough memory. LiteLLM’s gateway image runs out of memory and is killed at 512 MB (exit 137) before it can pass a health check. About 2 GB is a safe floor.
- Override the container
entryPoint. The official image’s entrypoint islitellm. If you render a config at startup with a shell script, setentryPoint: ['/bin/sh','-c']or your script is passed as arguments tolitellm. - IAM role and security-group descriptions must be ASCII. Em-dashes and
->arrows are rejected by IAM and Amazon EC2. - Confirm model availability in your account and Region. Model IDs and CRIS profiles change. Verify with
aws bedrock list-inference-profiles(for example, we usedclaude-haiku-4-5becauseclaude-haiku-3-5was not available).
Clean up
This post walks through the pattern with illustrative snippets rather than a single deployable stack, there’s no one-command teardown. But the architecture relies on several resources that continue to bill while they run. These include the AWS Fargate service, Amazon RDS (PostgreSQL), Amazon ElastiCache for Valkey, and the Application Load Balancer, along with supporting Secrets Manager secrets, CloudWatch alarms, and Amazon Bedrock application inference profiles. When you finish testing, remove them to avoid ongoing charges.
If you deployed the full solution using the Guidance for Multi-Provider Generative AI Gateway on AWS, follow that solution’s cleanup instructions to remove everything it created. For AWS CDK, run cdk destroy. For AWS CloudFormation, delete the stack.
If you built the pattern yourself from the snippets in this post, remove each resource:
- AWS Fargate service and cluster: Delete the Amazon Elastic Container Service (Amazon ECS) service to stop and drain the tasks, then delete the cluster.
- Application Load Balancer: Delete the ALB along with its listeners and target groups.
- Amazon RDS (PostgreSQL): Delete the database instance. Take a final snapshot first only if you need to retain API key and spend data.
- Amazon ElastiCache for Valkey: Delete the replication group or cluster. It holds only cache data, so no snapshot is needed.
- Amazon Bedrock application inference profiles: Delete the profiles created in Step 3, either by removing the AWS CDK construct or by running
aws bedrock delete-inference-profile. - AWS Secrets Manager secrets: Schedule deletion of the proxy’s secrets, such as the master key and database credentials.
- Amazon CloudWatch alarms and log groups: Delete the TPM alarm and any LiteLLM log groups.
Delete the AWS Fargate service and ALB before the Amazon RDS and ElastiCache endpoints they depend on, so running tasks don’t error against removed backends during teardown.
Conclusion
In this post, we detailed a pattern for an LLM gateway that abstracts the multi-model architecture of Amazon Bedrock to provide your teams with scalable and observable self-service access. Because Amazon Bedrock routes across models through a single interface without changing infrastructure, your developers get instant access to foundation models through familiar APIs. Cost governance, observability, and a single control plane go to your engineering and security teams while finance gets per-user attribution without you building a custom metering infrastructure.
Start by working through the pattern and snippets in this post to understand how the pieces fit together. The AWS CDK snippets cover the Amazon Bedrock application inference profile, its IAM policy, and the CloudWatch alarm. The surrounding AWS Fargate service, Amazon RDS, Amazon ElastiCache, ALB, and AWS Secrets Manager resources follow standard AWS CDK patterns and aren’t shown.
When you’re ready for a complete, deployable implementation, the Guidance for Multi-Provider Generative AI Gateway on AWS closely aligns with this pattern. You can find the guide on the AWS Solutions Library with the accompanying blog post and GitHub projects. While this post stepped through the same core pattern, it focused on Amazon Bedrock for developer coding assistants. The larger solution architecture adds multi-provider support, Amazon ECS or Amazon Elastic Kubernetes Service (Amazon EKS), Amazon CloudFront and AWS WAF options, and an admin UI.
Explore the components of this architecture with additional documentation for Amazon Bedrock Inference Profiles, LiteLLM gateway, AWS Fargate, and Langfuse.
Try this pattern in your organization. Start with a pilot team, validate the cost controls, and scale from there.
About the authors
来源: AWS Machine Learning Blog · aws.amazon.com